rsxse240
Local Delivery Truck Driver

Posts: 29
|
Post by rsxse240 on Jan 31, 2011 4:24:35 GMT -5
A bit glossy, and although I am not THAT familliar with such specific details, I would say it looks really good if it were a custom application, not a OEM part (obviously). I have only ever seen the ones that are just a thin strip of rubber that just kind of sticks out past the stainless strip and is only held in by the tension on the strap/weight of the tank.
|
|
|
|
Post by crackerboxkid on Jan 31, 2011 22:43:52 GMT -5
Sorry.... I thought they WERE the real thing!!!!! Your skills and techniques are just mindblowing. Do you do your own photo etching. Now THERE'S a skill I wish I had.... I'm getting ready to embark upon my own 1/16th scale "adventure". One of the tricky areas I'm gonna run into is how I'm going to represent the rubber molding around the winshield. Any suggestions?
|
|
|
|
Post by signature600 on Feb 1, 2011 6:11:53 GMT -5
A bit glossy, and although I am not THAT familliar with such specific details, I would say it looks really good if it were a custom application, not a OEM part (obviously). I have only ever seen the ones that are just a thin strip of rubber that just kind of sticks out past the stainless strip and is only held in by the tension on the strap/weight of the tank. It will lose the gloss, after the rubber has settled and I give them a rub with some fine s/paper 1200 grit will do, as for the rubbers themselves, they are a OEM part, we don't use just the rubbers here, we have the moulded type Sorry.... I thought they WERE the real thing!!!!! Your skills and techniques are just mindblowing. Do you do your own photo etching. Now THERE'S a skill I wish I had.... I'm getting ready to embark upon my own 1/16th scale "adventure". One of the tricky areas I'm gonna run into is how I'm going to represent the rubber molding around the winshield. Any suggestions? Thanks, the windscreen rubbers are available, or you can make your own pretty easy, they are just a H shaped channel with half round on top, then cast them in rubber, maybe cheaper to just buy them |
|
|
|
Post by brockway359 on Feb 4, 2011 23:21:01 GMT -5
Dude, I give up! My best work looks like @#$^ next to your "mistakes"! Keep up the
good work. I'll be following this one to the finish.
|
|
|
|
Post by crackerboxkid on Feb 11, 2011 10:15:48 GMT -5
You say those windshield rubbers are available... WHERE? That would sure save me some work!
|
|
|
|
Post by firefighter8104 on Feb 22, 2011 22:09:40 GMT -5
wow thats some cool details
|
|
|
|
Post by lowandphatg on Feb 23, 2011 0:44:10 GMT -5
wow nice work, gna b sharp ,
jack
|
|
|
|
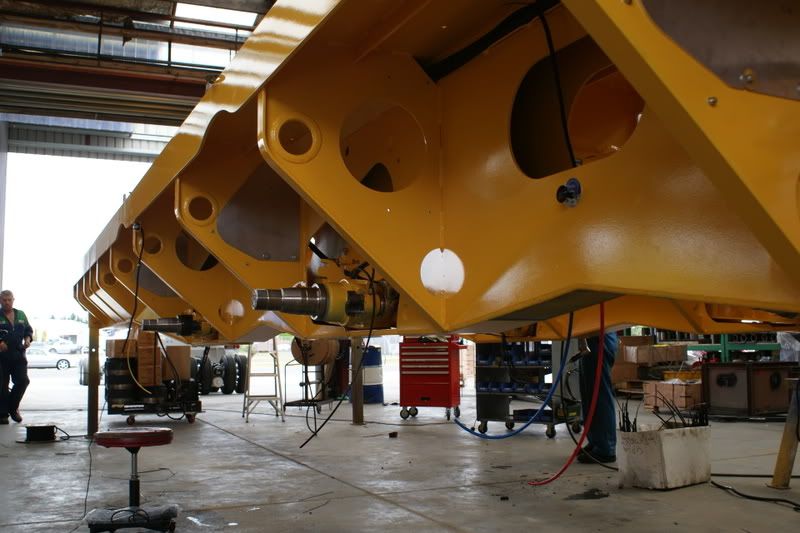
Post by signature600 on Aug 26, 2011 1:59:09 GMT -5
Just a small update on this epic adventure, I really wasn't happy with the end result of the last tank brackets, so I re thought how to make them, and decided to make them almost like what Kenworth use, the chassis and most of the brackets are hydro formed, well wasn't going to do that, but got close, I made some tooling and had a bit of a muck around with it and came up with this  These do look a lot better, but still need a little bit more of a touch up to be right, and when all the hardware in on them they should look OK |
|
dave54tf
Local Delivery Truck Driver
Posts: 345
|
Post by dave54tf on Aug 26, 2011 4:21:48 GMT -5
wow !!! alot of work into this one but looking really good ,some skill you have got there !!
|
|
-DJVG-
Local Delivery Truck Driver
Posts: 134
|
Post by -DJVG- on Sept 1, 2011 20:18:23 GMT -5
Cant wait to see this finished
|
|
checkmate
Local Delivery Truck Driver
Posts: 28
|
Post by checkmate on Sept 2, 2011 5:32:09 GMT -5
Awesome work.
|
|
|
|
Post by lowandphatg on Sept 5, 2011 20:24:47 GMT -5
WOW some nice workmanship to say the least ...
jack
|
|
|
|
Post by signature600 on Dec 2, 2011 17:49:15 GMT -5
Ok, the job continues on this, it has been a while since I have done anything with it, I got a little inspired to do some more to the tank J brackets I liked how the J brackets are, but they can be better, with that in mind, here is the latest for these, I made the straps for the brackets, they will look something like this   and no they are not a $1 each, I couldn't find the rubber I had made for these, I will cast up some more, and put these all together I have made all the straps, just need to make the 9 more J brackets to go with them The 2 drilled holes on the bracket is for the step, the strap still needs a L bracket for the top step mount, they will look ok when done I think Comment or criticism all welcome, do you think they could they be made better?  and what would you change? |
|
|
|
Post by truckabilly on Dec 7, 2011 15:37:58 GMT -5
I think you are doing very nice job on this. What would I change? I would not do it at all, in the first place. For I am not as skilled as you are. No, seriously, I think it is tremendous. Keep on the great work.
Jarda
|
|
|
|
Post by signature600 on Apr 13, 2012 6:47:33 GMT -5
And the build continues I have made the guards for this, was going to make them in brass, and chrome plate them  But I polished the Aluminium guards, and they turned out ok, so am happy to use the Aluminium guards,the rolled edge was fun, and think they look good  What do you think? Now back to the brass chassis, lots of parts to make for it I have made the brackets, and am casting these in white metal, |
|


 and what would you change?