kerr54
Local Delivery Truck Driver

Posts: 189
|
Post by kerr54 on Jun 27, 2011 20:14:21 GMT -5
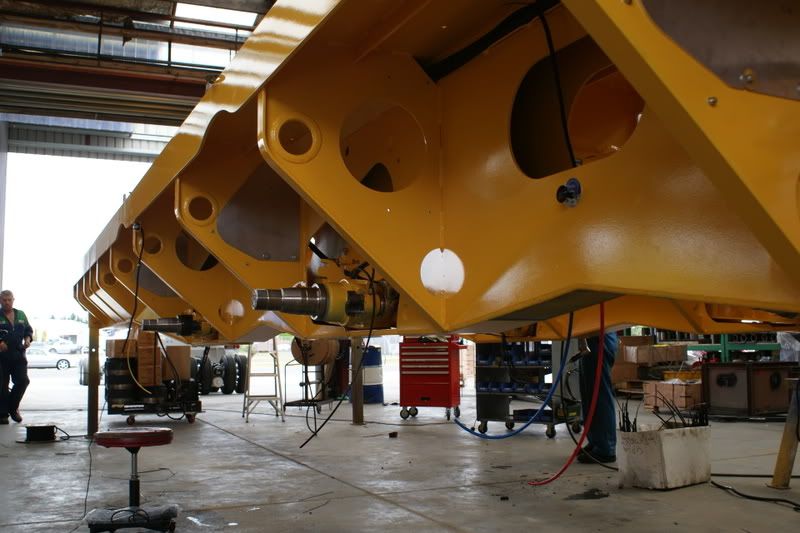
Hello guys, well I have started my crawer crane build and I do apologize for not having any pics at the moment but my project is just out of the cad program stage and I am going to attack the tracks first. "signature" was kind enough to share with me the pics of how he made his tracks and he makes it look easy. But I think the tracks for my crane is going to be the real test of my abilities. I am posting a pic of the tracks again here to show you guys what I'm shooting for. So any comments or suggestions would be very appreciated. Now to talk about the tracks, signature as I said shared with me some pics on another thread on how he made his tracks and signature your tracks look very good but they are flat and looking at what I'm trying to copy, they have a bevel on both sides and a slight curve over the top outside. I am going to try and post a j-peg of the way I think this tracks are as I made them on the cad program. I have glued up some blanks that are 1/8 inch thick and 1 11/16 wide. I plan to mill the bevels on each edge of one side and then shape the curve on the other side and then cut the blanks to the size of the shoe. After which I plan to make a jig for placing the tubing and other parts and hopefully this will all work out. But the wife is hollering and I need to get going. I do hope to hear from you guys (if you understand my plan) and tell me what you think. until later Kerry 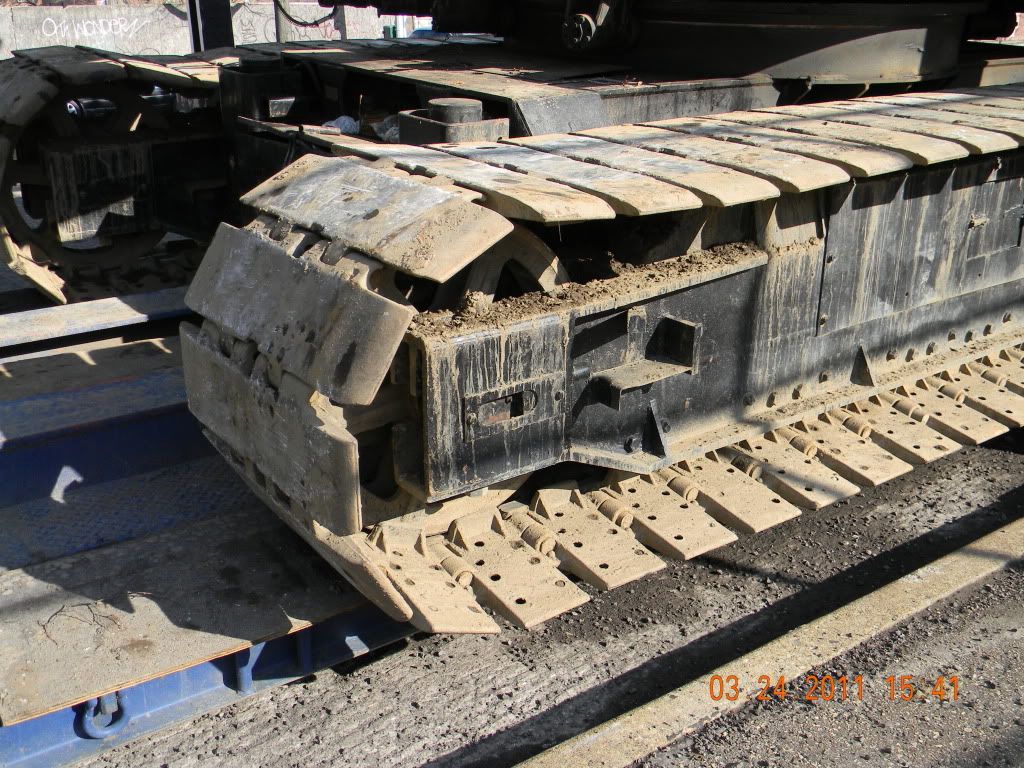 okay the cad pic is not working for me so.......i will keep trying... Kerry |
|
|
|
Post by signature600 on Jun 28, 2011 3:25:39 GMT -5
Kerry
Unless you are building a exact replica of the crane in the picture, then a little modellers license can be used,
With my tracks they where for a different crane, and with yours they are easy to do, but remember 4 on the heel, and 2 on the toe of the shoe, the shape is also easy, do them flat like mine, then add a small section to build it up in the centre then use some putty or the likes to shape what you need, make 6 of them then cast them .... easy
Either way, I am sure you will make then right,
Look forward to seeing more
|
|
kerr54
Local Delivery Truck Driver
Posts: 189
|
Post by kerr54 on Jun 28, 2011 5:22:55 GMT -5
Okay, I follow everything your saying up to the casting part. Casting means to replicate or duplicate and I'm not sure on this one. That would be something new for me. But I have noticed with my research that pretty much every crane has different tracks with different shapes and sizes, depending on the load rating of the crane. My crane is an old Manitowoc 2900cc and it just happen to be sitting close to my job. Thanks sig, I'll keep you posted.
Kerry
|
|
|
|
Post by gatormarcstaug on Jul 3, 2011 13:17:29 GMT -5
Kerry,
This sounds like an interesting project! I will be following it closely.
If you are interested I may have some cast resin sheaves you might like.
However at this point they are not ready.
I have a crawler crane in mind as well. But it will be my own design based on my years in the trade.
Good luck with this project!
Gator
|
|
kerr54
Local Delivery Truck Driver
Posts: 189
|
Post by kerr54 on Jul 22, 2011 4:50:48 GMT -5
Hey Gator, my crane is sloooooowly coming along as I will post some pics tomorrow of it's progress and thanks for your comments. I would be interested in the sheaves you mentioned, can you give a pic of them?
Kerry
|
|
kerr54
Local Delivery Truck Driver
Posts: 189
|
Post by kerr54 on Jul 22, 2011 18:06:04 GMT -5
Okay guys, As I said earlier, it is coming along but slowly as I work on it when I can as I guess we all do and I'm sorry for not getting back here sooner. But I did take some pics of a few parts that I am currently working on and some I think is complete some is still going on but this is what I have so far. This first one is of the tracks and I started with strips of plastic 1 9/16" wide and of various lengths that I had taken to my job and used a nice paper cutter to cut to the exact width.  Next is where I took the strips and glued a .188 strip down the middle for the raised portion in the center of the track. 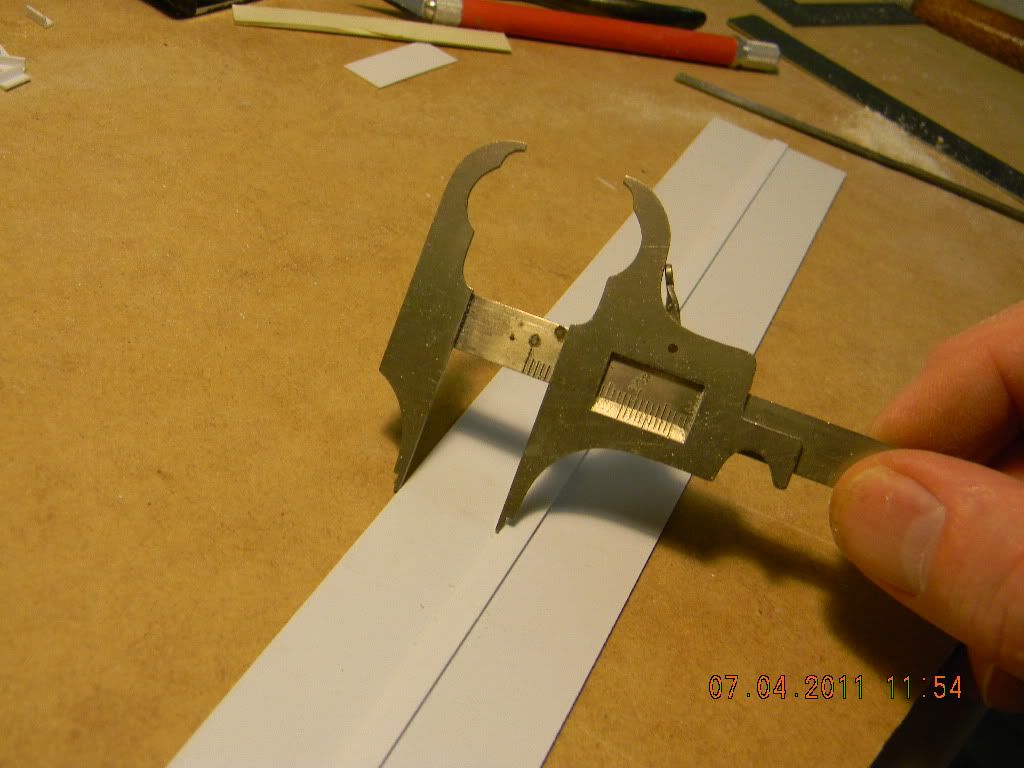 Next is me cutting the cleats to actual size using a jig that I constructed that helped ALOT. I cut them to .437. Now they are at a width of .437 and length of 1.562 with the built up center. As the second pics demonstrates. 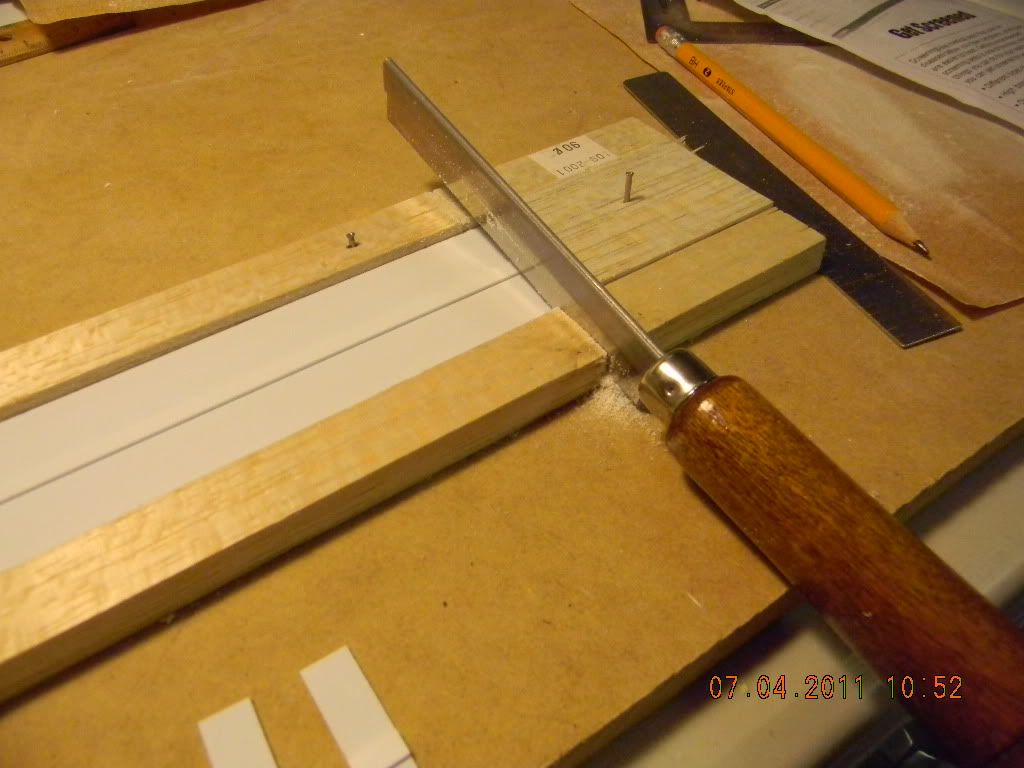 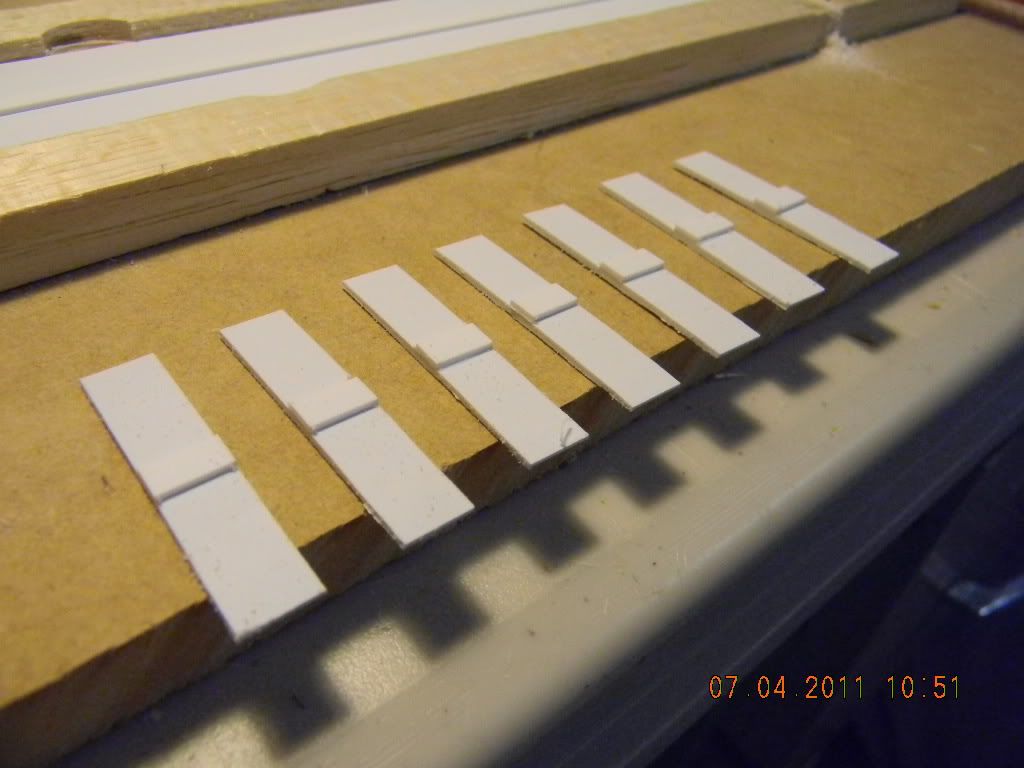 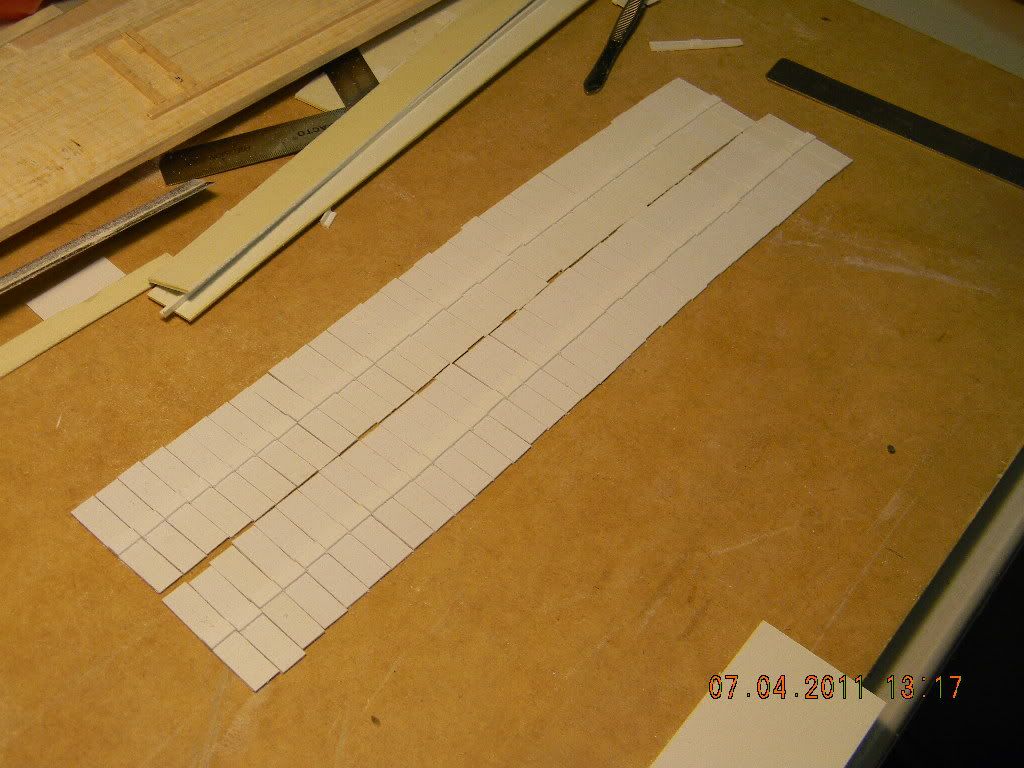 Next I cut tons of 3.2mm styrene angle with the assistance of yet another jig roughly 11mm long and trimmed the top corners at a 45* angle. 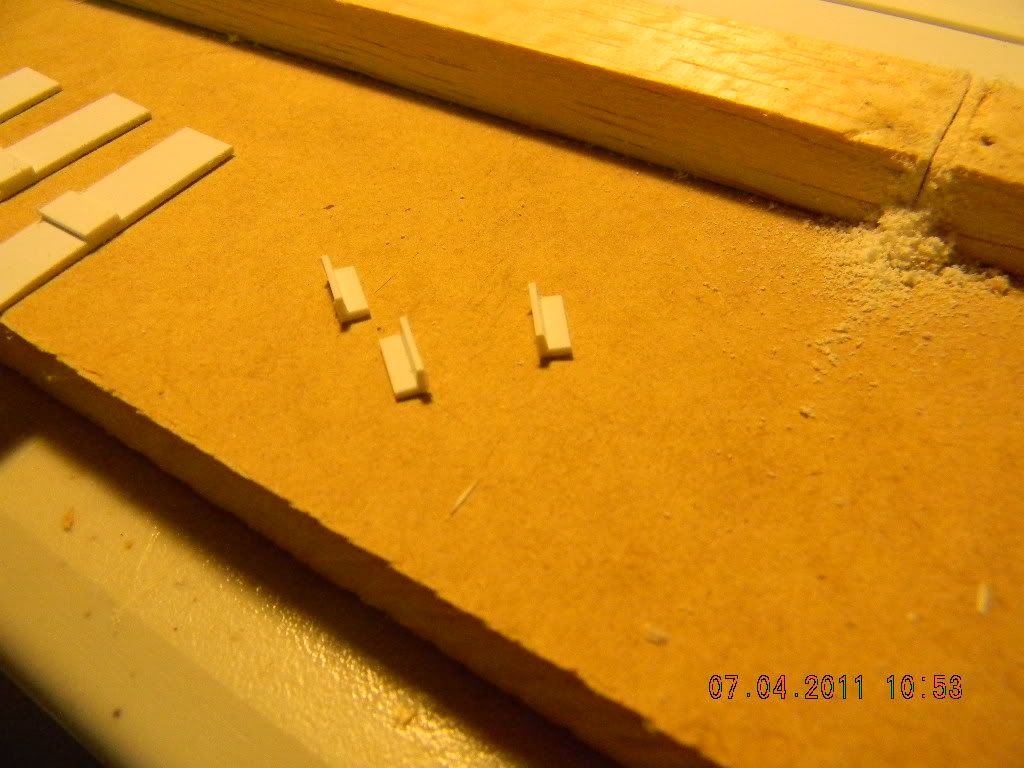 Next came the tubing to join the cleats together which is a few of them. 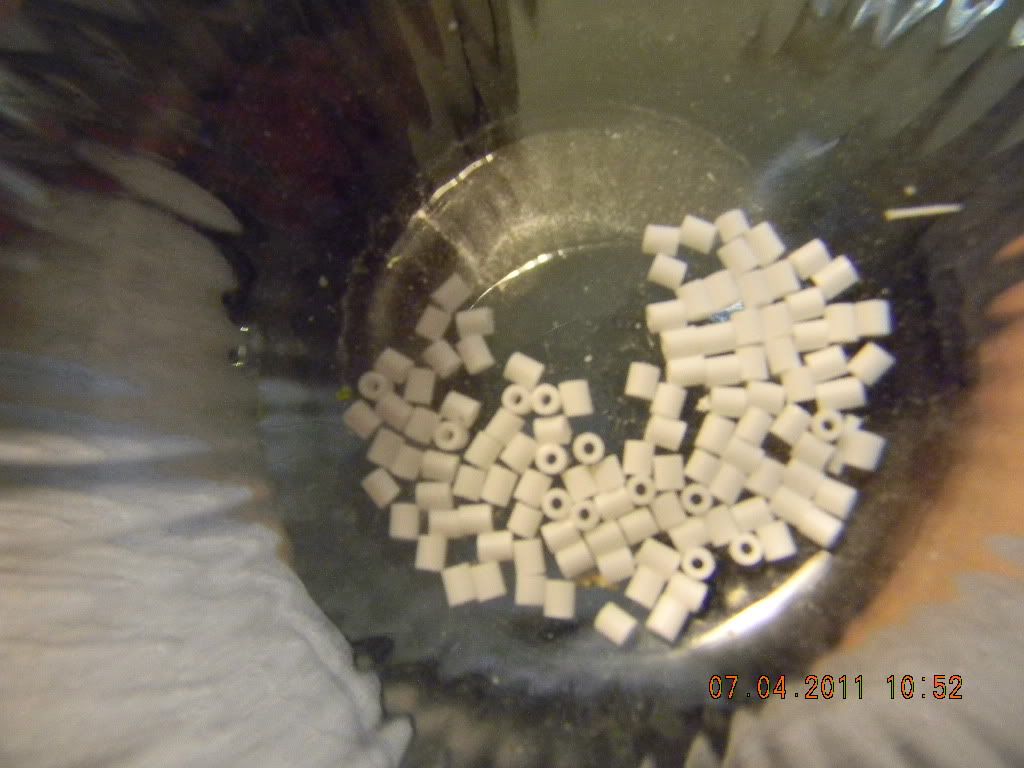 Now with all those pieces done and sanded and cleaned they go together to look like this. Which is the look that I was looking for. 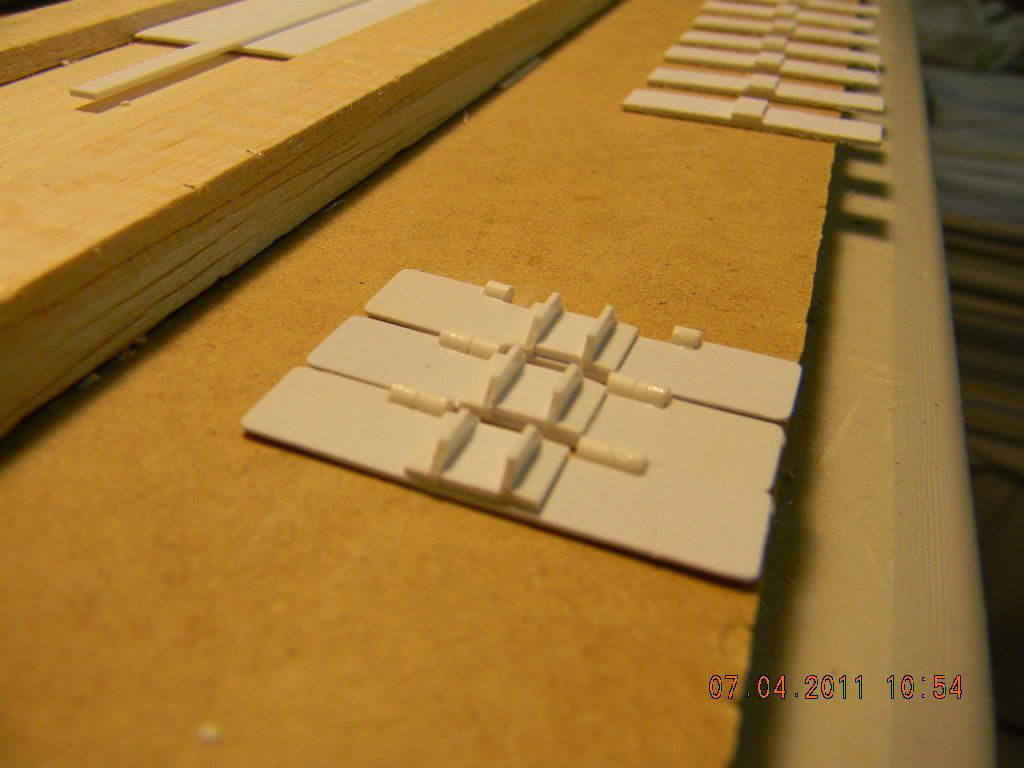 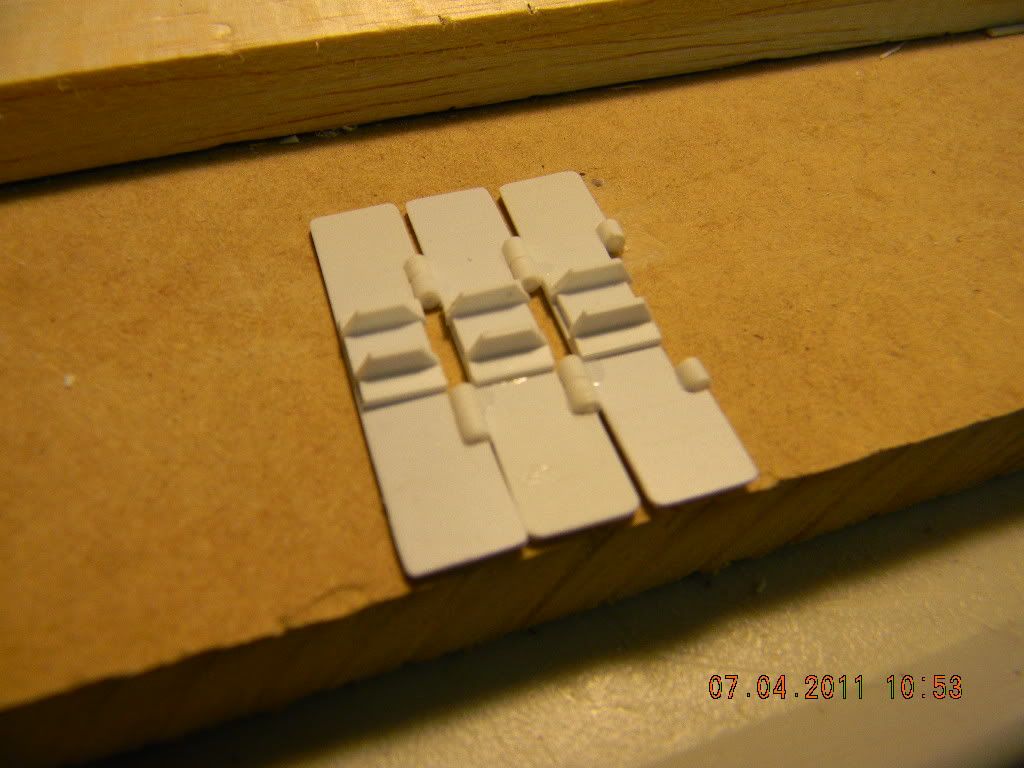 This one is a collection of all the parts I have so far. I have no idea what the correct names of this parts are, I have my names for them. ha ha But the tracks are or the parts for the tracks are done, it's just I thought I would try and complete the drive train to an extent to get a more precise length for the tracks. 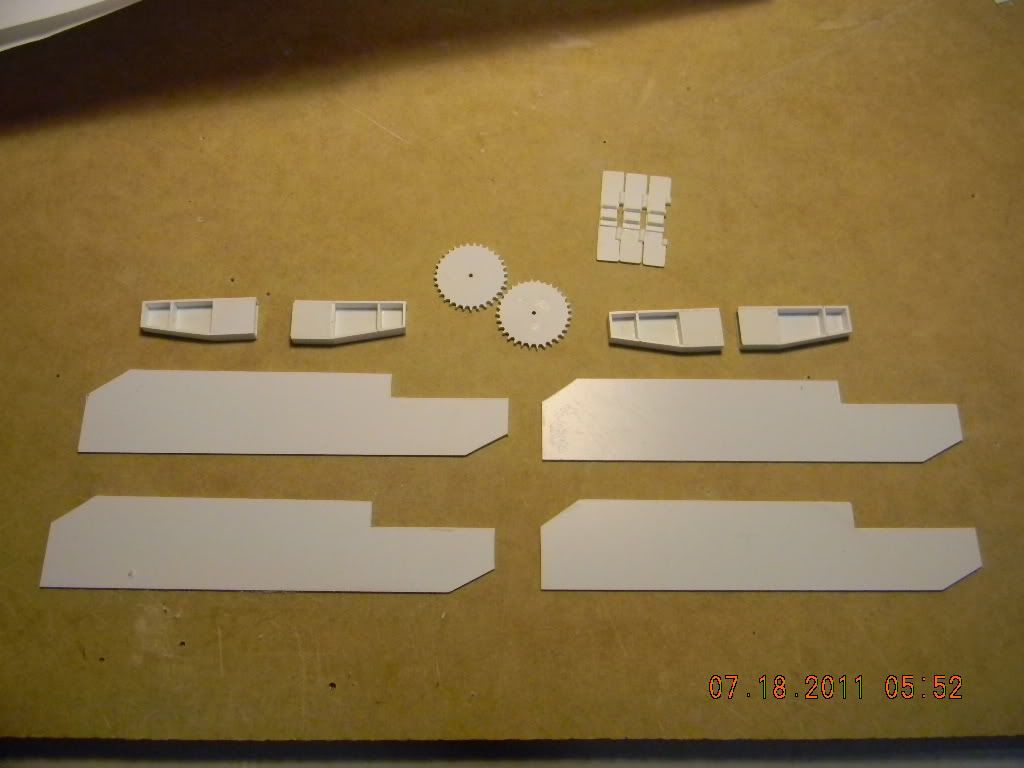 This one is mostly for the sprockets that the drive chain will pull. I had some fun with these. I think they turned out well. 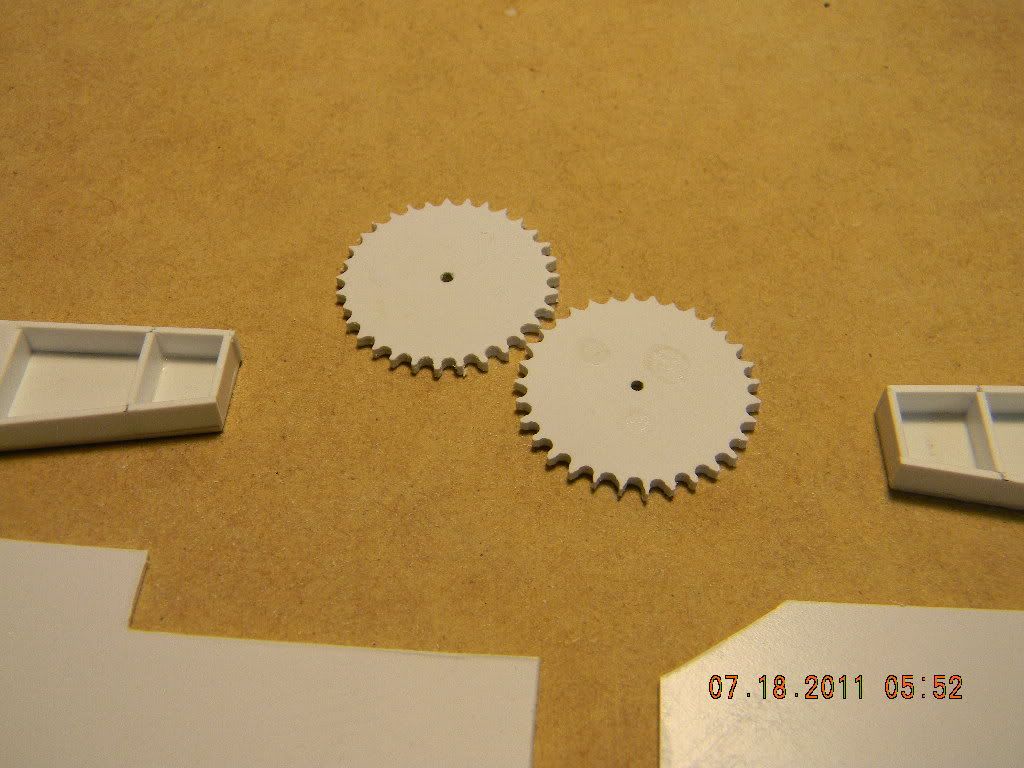 This one is of the frame that will hold the drive mechanism of the crane. 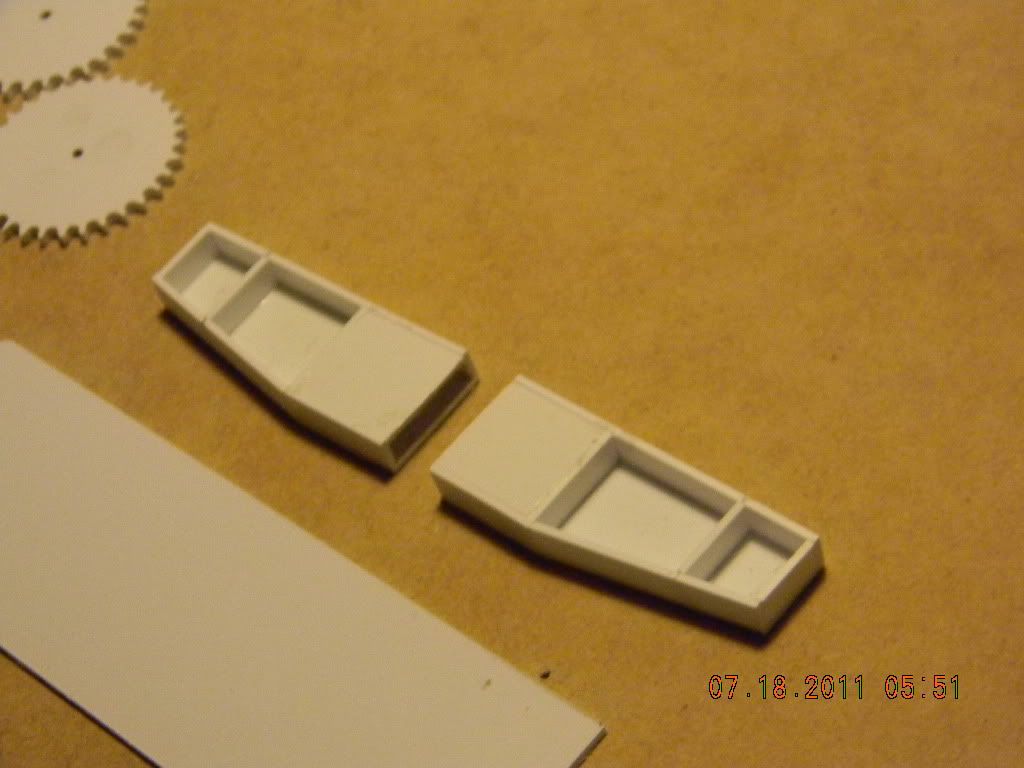 This is of the side of the drive that will go together with other parts to make up the entire piece, 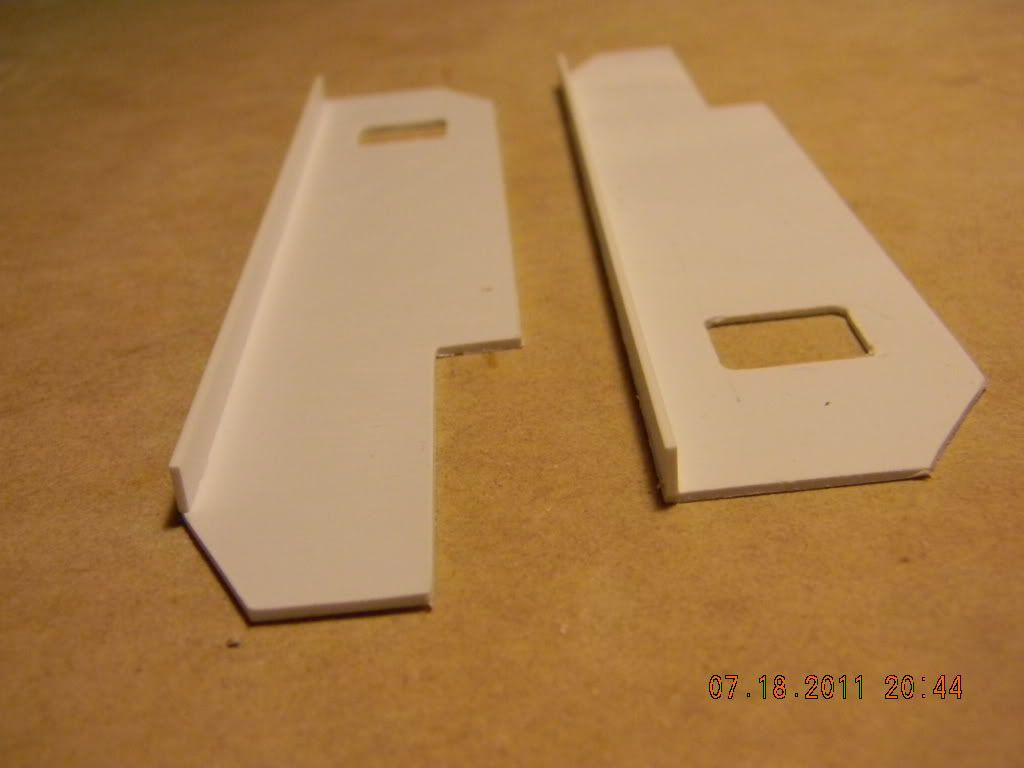 I've never done this before (try to be instructional) and I do hope that these pics is helpful and also help you understand the building of my crane. I'm having tons of fun doing it and I'm very excited about it. As always, your comments are welcome and I will post more as I get to them or move along with my project. Happy building and speak to you soon Kerry |
|
|
|
Post by gatormarcstaug on Jul 22, 2011 20:32:54 GMT -5
Kerry,
You are off to a really good start. When I scratch built an excavator a few years ago.
I did the tracks pretty much like you are doing, including cutting them all by hand. Until I got my two inch table saw from Micro-Mark . The greatest investment I ever made for my hobby, well almost.
I will try to take some pics of the sheaves and the boom I scratch built.
Gator
|
|
41chevy
CDL Student Driver
MY B-61
Posts: 743 
|
Post by 41chevy on Jul 23, 2011 10:50:33 GMT -5
Coming along excellent!! How about a quick tutorial on how you did the sprockets? I need to do a set for my 49 Pete. Paul
|
|
kerr54
Local Delivery Truck Driver
Posts: 189
|
Post by kerr54 on Jul 23, 2011 14:10:48 GMT -5
Gator, a two inch table saw?? Wow...I've seen those on e-bay. Always thought they were....... well, not very good. Almost a toy. Does it work well? I would like very much to see those pics Gator. Paul, about those sprockets...I didn't take any pictures of building them but what I did was after I laid out the spacing and size with a cad program, getting the teeth spacing at 32 teeth per inch and the size of hole needed for this project and then printing that lay-out out actual size, I then had a template I could lightly glue on top of my stock. I then cut two pieces of stock about 1.3" with the final dia. of 1.2" and lightly glued them together. While cutting them out with my circle cutter I had my center determined so I drilled a small hole in center in order for a small nail to fit. I then put that small nail in a block of wood and slid the sprocket blanks over it so as to spin. I then set up my Dremil drill press with a 3/32 drill bit and after gluing the template over the stock, all I had to do was follow that and drill the holes. After sweating through that part, I then took a combination of small circle files and flat files and filed the sprockets to the shape and spacing I needed. Not getting in any hurry with it and being really careful, I think they turned out okay. I still need to do the small sprocket which is another story ha ha . I did go out and buy the Dremil drill press for this project because I thought it would come in really handy and it did. But this worked for me and if you need further details please ask. But I could not have done it without the cad program (which took some doing with the spacing) and the drill press. I did finish the carriage rollers this thing this afternoon but my camera has exhausted the batteries. But I will get them replaced and get a pic or two of them as well as the drill press set up with the block of wood with the small nail in it so you can see. Paul if I can help in any way let me know and thanks for your comments. Also I am posting a pic of the cad program lay-out. Hope it turns out okay.... Kerry 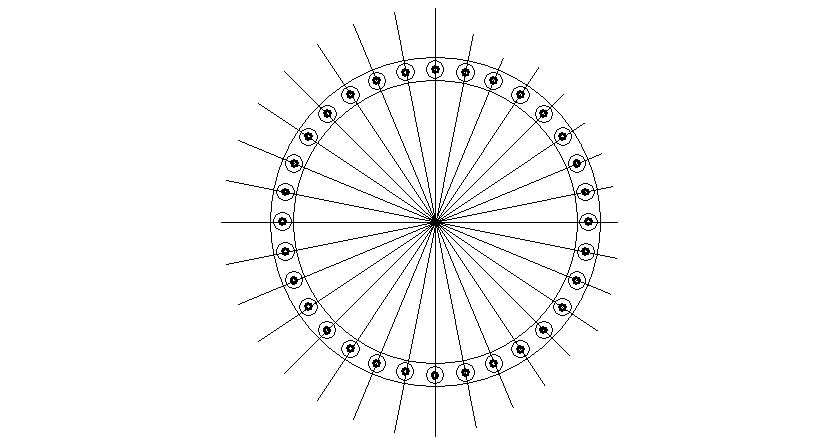 |
|
41chevy
CDL Student Driver
MY B-61
Posts: 743
|
Post by 41chevy on Jul 23, 2011 14:47:43 GMT -5
Thank you that help. I have one of the Micro Mark saws also. With the pression fence I can get accurate cuts to .001 inch. my saw ran almost $300.00 with the Pression fence and a fine tooth blade set. I almost bought an indexing attachment for my Sherline but never did. I'll try your method. Thanks again! Paul
|
|
|
|
Post by gatormarcstaug on Jul 23, 2011 15:24:13 GMT -5
Kerry, For the hobby type table saws go to micro-mark.com . You will see both the one I have and the one that Paul mentioned. Which is the better one. But mine works for me until I can get the better one. I have found however that when cutting duplicate parts, in my case any way. it is better to have too many than not enough. Once you set up the rip fence or miter it is good to go. But trying to go back and get it exactly the same.... lets just say it leaves a bit to be desired. But then it is not being touted as being as accurate as the more expensive model.( Which I wish I had). Try this link for some parts www.tamiyausa.com/ You will have to look around, the educational and robotics pages there are some interesting pieces to be had there. OH here is the link on this site for a couple of pictures of my excavator. pete389.proboards.com/i I will try to find the pictures of my boom and the sheaves! Gator |
|
41chevy
CDL Student Driver
MY B-61
Posts: 743
|
Post by 41chevy on Jul 23, 2011 16:39:08 GMT -5
Both saws work well, it's mostly the user. I got a good deal on the the big one. At the time I was doing 1/200 scale RC ships and needed the accuracy. I agree with Marc, I always cut 1/2 again more than I need. Paul
|
|
|
|
Post by gatormarcstaug on Jul 23, 2011 19:55:28 GMT -5
Kerry, I found four pictures of the crane boom. Two pretty well show the sheaves I am talking about. I still have to look for some of the lose ones I have left.     Hope these help some! Gator |
|
|
|
Post by signature600 on Jul 25, 2011 1:32:30 GMT -5
Kerry,
Nice work so far, and using the jig is the way to go,
just take a little care with the drive sprockets, the should be the thickness as the 0.188 stripe you glued down the centre, the front sprocket so also be the same width, this stops the tracks falling off when the machine is turning, as well as the obvious, tight tracks stop it as well,
Now where do the pins sit that the sprocket drives?I can not see where the pins are in the pic that you have posted
The frame parts that you have built so far look really good, and look forward to seeing another update soon
|
|
kerr54
Local Delivery Truck Driver
Posts: 189
|
Post by kerr54 on Jul 25, 2011 18:11:21 GMT -5
I like it when people talk to me to leave their name so I don't wind up calling them by their sign on name, and I do hope I don't offend anyone by saying that but I thank you for your comment and your advice. By you saying what you did made me go back and take a closer look at my sprocket for which I seen a problem. I think... I do know that I have not cut the sprockets spokes is one of the things and the other is now I'm not sure weather the two sprockets (one for chain & one for tracks) aren't made as one. I have scheduled a re-visit with my friend with the real crane to take a closer look at that. But I don't understand what pins you are talking about. Could you please explain. I want this to be right and if you see something now is the time to make corrections. I welcome any comment or advice. I could not have done this without the jigs. I learned long ago from my father who is or was a fine craftsman at woodworking about how helpful and important jigs are. But I would like to say also that I am enjoying making and building this project very much and a big part of that enjoyment comes from sharing this with you guys. I am currently working on the carriage wheels that go underneath but I need some 1/8 tubing to complete that so I should be back on track in a day or so. Meanwhile I am going to research that sprocket to make sure it's correct. Gator, the pics help very much. I do see how you've made a really nice boom. I'm excited to get to that part of my project. What did or how did you make the sheaves? I also noticed that I think the boom was constructed from tubing rather than angle. It looks really great Gator. Sorry for being alittle long winded but I do enjoy talking about this and learning more from you guys. Thanks again
|
|