rnagle
CDL Student Driver

Posts: 564
|
Post by rnagle on May 28, 2011 19:21:20 GMT -5
New project just started, been "planning" it for close to a year after seeing prototype truck posted on Hank's Truck Forum last summer. 1983 Kenworth originally on with Imperial Oil (Esso) for pulling fuel tankers in Ontario, Canada. Enough subtle differences from "stock" KW cabovers to make it quite interesting: 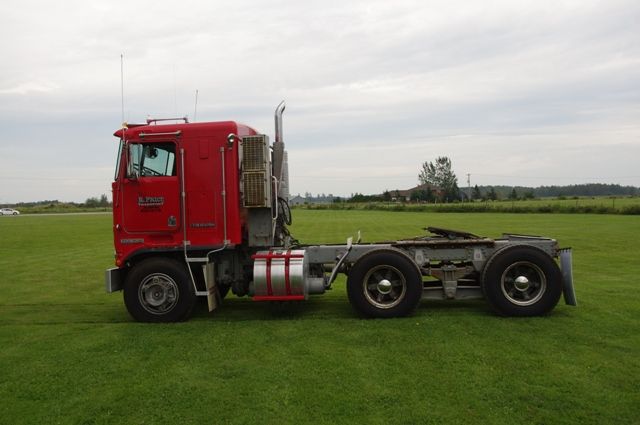 Round 2's reissue of the old AMT K123 was an obvious starting point, Plaskit resin parts are 6 spoke wheels front & rear, rear air brake detail set, 72" spread Hendrickson suspension and fold down steps for front bumper. Not shown is a partially built AMT Aerodyne parts kit bought for 8V92T engine and related "bits". Many thanks to a fellow modeller who gave me the correct wider grille , cab steps & door latches to update AMT's cab. 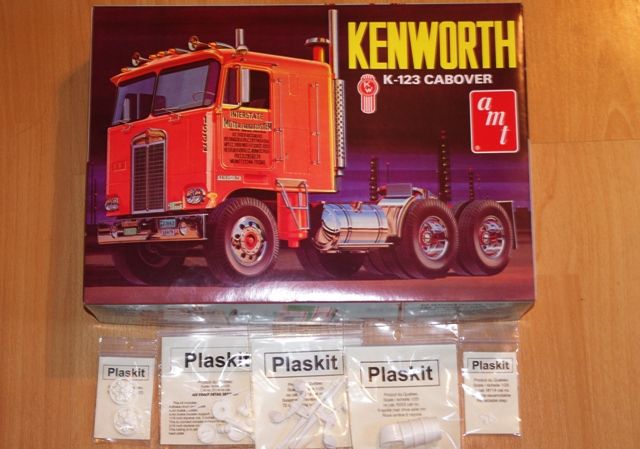 |
|
rnagle
CDL Student Driver
Posts: 564
|
Post by rnagle on May 28, 2011 19:24:19 GMT -5
Stock K123 frame rails are correct length, front crossmember & rad from Aerodyne kit used to match Detroit engine: 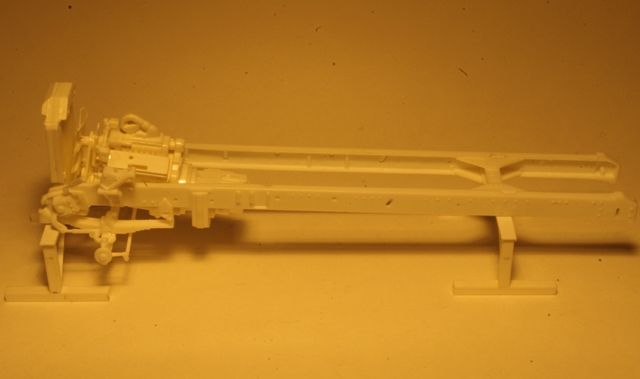 Prototype cab is a bit shorter than kit one, works out to 5/16" strip removed. Olfa hook blade knife and straightedge work well for getting a clean, accurate cut:  Rear wall re-attached to cab - felt like I was building one of AMT's White-Freightliner kits!  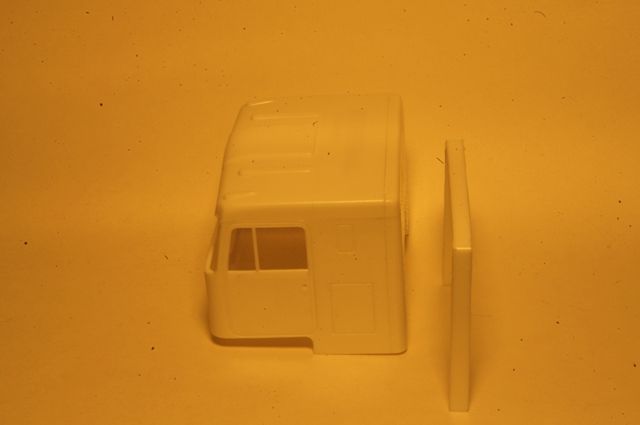 |
|
-DJVG-
Local Delivery Truck Driver
Posts: 134
|
Post by -DJVG- on May 28, 2011 19:33:51 GMT -5
Thats a fair old spread shes got there lol, looks interesting to me, if your building it to the standard of your superliner itl be well worth watching this come together. Whats mounted up behind the cab on the 1:1 extra coolers?
|
|
|
|
Post by slurrydog on May 28, 2011 20:12:36 GMT -5
This is going to be a nice project. You are off to a great start.
Dave
|
|
rnagle
CDL Student Driver
Posts: 564
|
Post by rnagle on May 28, 2011 21:10:14 GMT -5
Thanks guys, mounted behind the cab is a Farr dry element air cleaner much like what AMT has in the Road Boss (and I think Diamond Reo) kit
|
|
|
|
Post by gatormarcstaug on May 29, 2011 0:03:55 GMT -5
Robert,
That looks lie it will be one heck of a project!
Gator
|
|
roy1964
Local Delivery Truck Driver
AERODYNES FOREVER
Posts: 88
|
Post by roy1964 on May 29, 2011 6:38:11 GMT -5
Gonna be a great lookin' project Robert!!! Roy
|
|
|
|
Post by loghauler70 on May 30, 2011 15:27:13 GMT -5
Wow! That is going to be a cool truck I can't wait to see more
Mark
|
|
rnagle
CDL Student Driver
Posts: 564
|
Post by rnagle on May 30, 2011 20:13:10 GMT -5
Slowly plugging away, Plaskit's rear suspension is a pretty close match to prototype. Only thing missing is the longer main leaf & third bracket visible at right of prototype photo: 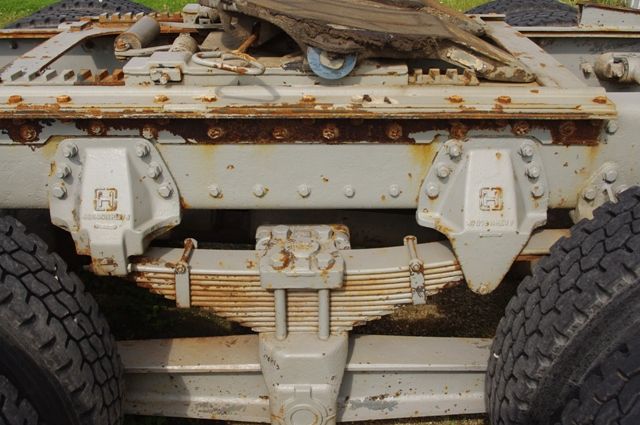 AMT's Hendrickson suspension in the K123 kit does have this piece  which was cut free and cemented to frame. Prior to attaching suspension, all molded on detail was removed from frame rails to provide a "clean slate": 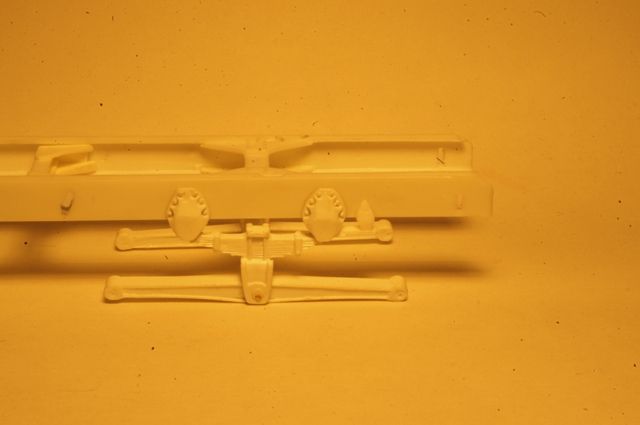 |
|
Deleted
Deleted Member
Posts: 0
|
Post by Deleted on May 30, 2011 22:51:14 GMT -5
This is going to look cool!
|
|
mofosamo
Local Delivery Truck Driver
Posts: 181
|
Post by mofosamo on Jun 1, 2011 1:51:50 GMT -5
After the detail work you put into your superliner I`d say this will be another one worth watching.
|
|
rnagle
CDL Student Driver
Posts: 564
|
Post by rnagle on Jun 3, 2011 20:56:58 GMT -5
K123 kit axles have nice "cast metal" texture on front and back, none on top or bottom. Most of this would get sanded off anyway when cleaning up seam between axle halves so lack of texture isn't really an issue, it is easy to add by brushing on Testors liquid cement and stippling surface with inexpensive stiff bristled watercolour paint brush. I suppose I could say I was practising this technique over 30 years ago as a youthful "glue bomber" - only using my fingerprints instead of the stiff bristle brush! Right hand side of axle top portion textured, left hand side not done yet:  |
|
rnagle
CDL Student Driver
Posts: 564
|
Post by rnagle on Jun 4, 2011 18:14:50 GMT -5
Installing rear axles involved adapting AMT's parts, I like the separate mounting brackets they provide. Round bosses intended to fit ends of AMT walking beam are too large to fit Plaskit's walking beams, solution was removing the boss and drilling bracket for 1/16" rod:  Walking beam end drilled out 1/16" to match, short piece of styrene rod joins bracket pairs. Styrene cement not bonding to resin works to great advantage here when assembling bracket pairs to walking beam: 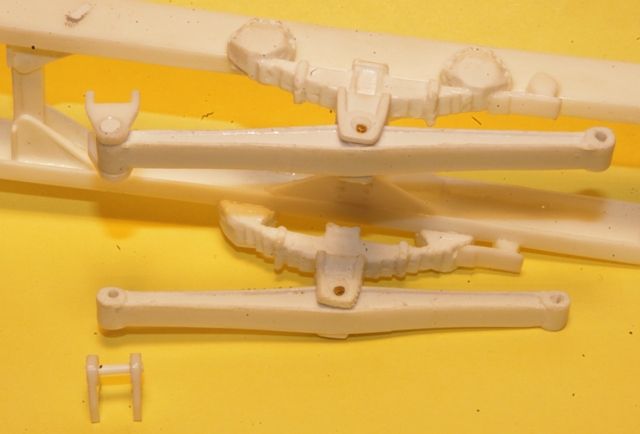 Axles installed, small round styrene disks made with Micro-Mark punch set clean up pivot points on brackets and walking beam. Kit driveshaft ends used with 1/8" styrene tube & 1/16" rod extension to match l-o-n-g 72" spread: 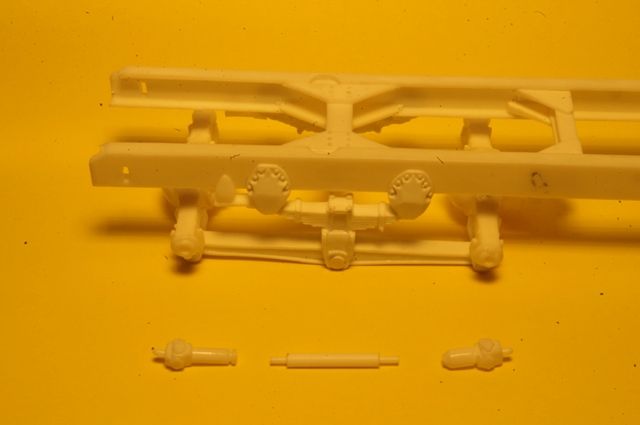 |
|
Deleted
Deleted Member
Posts: 0
|
Post by Deleted on Jun 5, 2011 8:15:17 GMT -5
Nice job on the rear axles. Why would you want a wide spread like that? They seem common in Canada back in the 1970s.
|
|
rnagle
CDL Student Driver
Posts: 564
|
Post by rnagle on Jun 5, 2011 8:53:50 GMT -5
The tandem with wider axle spacing was permitted to carry higher weights, I believe the difference was around 42,000# as compared to 34,000#. For some products like fuel or beer (another area where 72" spreads were common and still see some use today) that meant another 4 tons of payload!
|
|


 which was cut free and cemented to frame. Prior to attaching suspension, all molded on detail was removed from frame rails to provide a "clean slate":